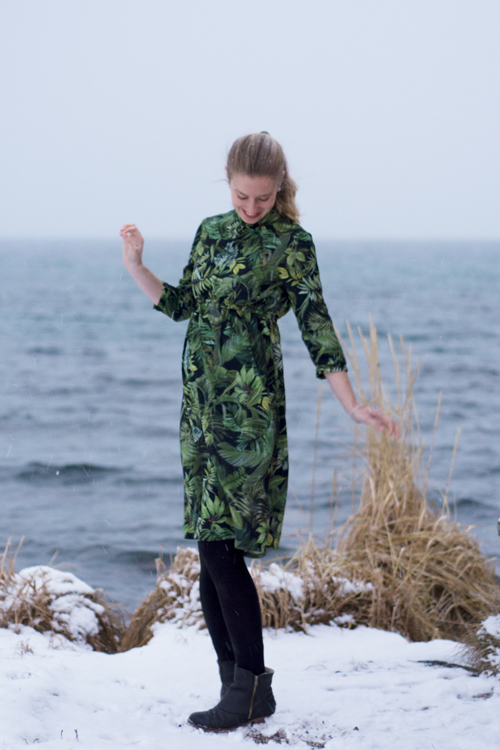
The moment I got the email from Sew Over It introducing their latest pattern, I knew I had to make it. The Florence Dress is a vintage-inspired dress with buttons in the front, a mandarin collar, an elastic waist, 3/4 sleeves and an A-line skirt. The upper buttons can be worn open or closed, but I really like the look of the closed dress – it looks so regal and sophisticated, in a way. But check out Dominique’s version on her blog – she is wearing her dress open and that makes for a quite different look.


When I saw the Florence Dress, I had just ordered two metres of this jungle polyester crepe from Fabric Godmother. Buying a poly fabric is something I rarely do, but I absolutely loved the print and couldn’t resist. The fabric is actually sold as a poly crepe, although it’s a rather slinky and thin fabric without the uneven texture I’d usually associate with crepe. What I absolutely love about it is the fact that the fabric doesn’t wrinkle. I can wash the dress, it dries in a second and I can wear it right away, without ironing. But I do feel a little less comfortable after a whole day dressed in polyester. I am just not used to it anymore! Almost every single garment I own these days is made of cotton, wool or viscose and I feel a little clammy wearing the polyester. And I had some other issues with the fabric while sewing – but more about that later. But I have good news for you: The same fabric is available as a lawn, too! I actually own that one, too. It’s a rather stable lawn, so maybe not perfect for a dress like this – but definitely an alternative to boxy tops, shorts and garments like that.


But back to the Florence Dress itself: You might remember my Penny Dress by Sew Over It. I wear that dress a lot and I really like it! I mentioned in that blog post that the construction is rather simple, making it a nice project for the not-so-experienced sewist. I think I can say the same thing about the Florence: It’s a lovely dress with a good fit, but with a rather simple construction – not the most refined pattern out there, maybe.



To make the dress work for maternity and beyond, I decided to raise the waistline of the dress and to make an empire waist version. It’s such an easy adjustment: Just chop off a little of the bodice and add a little to the skirt – that’s it! Widening the shoulders of a top or dress is a very usual adjustment for me – but I opted not to do it this time, and I think it worked perfectly. The instructions tell you to cut the back as two pieces, adding a seam to the middle of the back. This seemed quite unnecessary to me, so I removed the seam allowance and cut the back on the fold. Another change I made is adding cuffs to the sleeves. The sleeves are supposed to be hemmed by folding the edge once or twice, but I really felt that slim cuffs would work lovely for this style. So I cut two rectangles with a tiny bit less width than the edge of the sleeves, folded these and sewed them on. Done!



Sewing with the poly crepe wasn’t too difficult, but cutting it required some concentration, since the fabric is rather shifty. I used French seams for the whole dress, besides the waist seam, where the elastic casing is sewn. But I started to have some trouble when I started wearing the dress! The first thing I noticed was that the short seams at my cuffs pulled out. I figured it was since I forgot to interface my cuffs and had clipped the seam allowance rather short. So I ripped the cuffs out, cut new ones, interfaced them, left a big seam allowance and sewed them on again. Problem solved!


The next problem occurred after wearing the dress two or three times: I realized that the seams at my back shoulders started to look strained! They hadn’t ripped out yet, but the fabric started to look rather thin and I was sure that three or four times of wearing the dress might destroy the fabric. Since I had used French seams I decided to rip out the “outer” seam of the French seam at the back shoulder – if that makes sense? So the dress was still sewn together, but wrong sides together at the back. I then added a wide strip of interfacing to the wrong side of the fabric, both on the back sleeve and the back bodice, before sewing the back together again, using a slightly bigger seam allowance than before. And for now I think this fixed the problem! We’ll see how long the fabric holds up…


But regardless of the fabric issues – I love wearing this dress and I got quite some compliments for it during the last weeks. The style is so pretty and the fabric print is just awesome. It’s a rather unusual print for me, a little bold – but somehow just right anyway. And even if I might not be able to keep this dress for years to come, due to the fabric not holding up, just getting these pictures was worth it. It just started snowing while we were taking these pics and it was so grey and windy that day – you can hardly see the coast guard passing by in the back on some of the pics! But the snow and the mist make a lovely background for this green and lively jungle dress. A dress and a photo shoot to remember!


You can get your copy of the Florence dress over here, and don’t forget to check out Dominique’s blog post today! Although we weren’t able to take pics together this time (like last summer, when we made our matching Irene dresses), this was very much a collaboration, since we both loved the style so much.


This is probably my last blog post before Christmas, so all that’s left is to wish you a happy and peaceful Christmas together with your family, friends and loved ones.
– This blog post is linked to the German link party RUMS. –


So pretty!! Thanks for the interfacing tips. I am the same way about polyester.
[…] a lot with fabrics from Lady McElroy (the Phoenix Blouse, the Suki Kimono, the Emery Dress and the Florence Dress, I also have several other fabrics in my stash). You can imagine my delight when Hello Heidi […]